
What is Hernia?
A hernia is a common condition caused by weakness in the body and the weight of impure substances in the abdomen. The muscles of the lower part of the stomach become weak, forming a hole in the membrane, and the intestine comes out of the Peritoneum. Hernia can cause significant discomfort and pain. While hernia can occur in various body parts, the most common types affect the abdomen or groin.
In this condition, the intestine comes down where testicles join and create a knot. There is swelling at that place, there is too much pain and restlessness, which may be fatal sometimes. Sometimes a person who is suffering from a hernia does not feel pain.
Main Causes of Hernia
Causes that can increase the chances of hernia are:
- Constipation.
- Hard exercise.
- Too much pressure while passing stool.
- Too much gas in the stomach.
- Lifting too heavy weight.
- Bending the body in the wrong postures.
- Improper diet and taking alcoholic drinks.
Symptoms of Hernia
Some common symptoms of Hernia are:
- Bulge or Lump.
- Pain or Discomfort.
- Feeling of Fullness or Pressure.
- Acid Reflux.
- Nausea or Vomiting.
Importance of Yoga Poses in Hernia
In the case of Hernia, yoga poses are very beneficial, they strengthen and stretch the muscles around the affected area. Certain yoga poses can alleviate digestive problems which reduce the pressure on the abdominal wall and eases pain. Yoga improves flexibility, helps to prevent stiffness, and reduces discomfort caused by muscle tightness. It also improves blood circulation and reduces inflammation.
Yoga Poses for Hernia Pain Relief
There are 6 effective yoga poses which can reduce the hernia problems:
- Shoulder Stand Pose (Sarvangasana)
- Fish Pose (Matsyasana)
- Lotus Pose (Padmasan)
- Eagle Pose (Garurasan)
- Chair Pose (Utkatasan)
Shoulder Stand Pose (Sarvangasana)
Sarvanga means all the parts of the body and this pose (asana) benefits all parts of the body, especially the thyroid gland, which improves digestion, blood circulation, and respiration.

How to do it:
- Lie down on the back, hands should be on the sides and legs stretched out.
- Relax the body, now slowly raise both legs and when the legs make an angle of 30 degrees with the ground, remain in that position for five seconds.
- Now again raise the legs till they make an angle of 60 degrees and remain there for five seconds.
- Again, raise the legs till they are 90 degrees and remain there for 5 seconds.
- Now, keeping the legs straight, bring them towards the head till they make an angle of 120 degrees.
- Now lift the legs upwards as far as possible and bring the legs and body in one straight line, giving support to the body by both hands and the chin would be touching the throat.
- This position is Sarwang Asan. Now return to the original position.
After doing the Shoulder Stand Pose (Sarvangasana), one should do the Corpse Pose (Shavasana) for the same duration to give the body rest.
Duration
It can be done for a few seconds to three minutes, this pose is done only once daily.
Note: Those who have eye, ear, and heart problems, should not do this Pose.
Fish Pose (Matsyasana)
Matsya means fish, with this asana one can swim in water for a long time. Therefore, it is known as Fish Pose (Matsyasana). This pose is complimentary to the Shoulder Stand Pose (Sarvangasana). It must be done after Sarvangasana, but it should be done only one-quarter of the time during which Sarvangasana was done.

How to do it:
- Sit on the ground with legs stretched in front, now bend the legs in Padmasan pose,
- Bend backward with the help of elbows till the body is on the ground.
- Now bring both palms near the thighs.
- Bring the head as close to the back as possible, the weight of the body to be supported by the palms.
- Now the weight of the entire upper portion of the body would be on the head.
- The elbows would be on the ground.
- To return to the original position rise slowly with pressure on the elbows and sit straight.
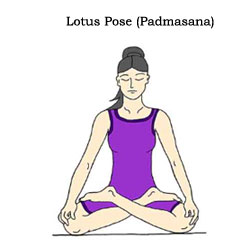
Lotus Pose (Padmasana)
The word Padmasana Sanskrit means lotus, in this pose the body takes the shape of a lotus. This pose may cause pain in the beginning but once get used to it soon, this can be done initially for a minute or so but later the period can be extended. Saints sit in this pose for hours.
It improves digestive power, removes constipation, and enhances appetite. Strengthen the muscles of the abdomen and waist. It gives relief from pain.
How to do it:
- To do this pose, spread a blanket or carpet on the floor and sit on it, spreading both legs forward. Bend the right leg at the knees and be comfortable.
- Now hold the ankle of the right leg with the right hand and catch the toes of the right leg with the left hand.
- Draw it inside the right leg, lifting it upwards with the help of both hands.
- Fix the heel of the right leg at the base of the left thigh with the help of both hands.
- Bend the knee of the left leg and hold the ankle of the left leg with the left hand.
- Hold the toes of the left foot with the right hand and then lift it with the help of both hands and fix the left heel at the base of the right thigh.
- Fix the index fingers of both hands at the base of the thumbs and spread out the three remaining fingers of both hands.
- Keep the waist, back, and neck straight.
Eagle Pose (Garurasana)
Garur is the name of a bird, in this pose the body takes the shape of Garur, therefore, it is called Garurasana. It helps with gout and pain in joints, hernia, and enlarged testicles.

How to do it:
- Stand on the ground.
- Wrap your right leg on the left and right arm on the left arm, as in a rope.
- Remain in this pose for 15 seconds.
- The duration can be increased up to 3 minutes.
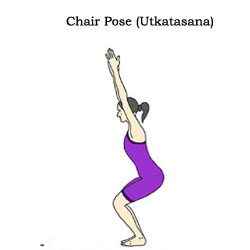
Chair Pose (Utkatasana)
In this pose the body takes the form of a chair, therefore, it is called Chair Pose (Utkatasana). This pose strengthens the body and removes pain in the waist, hernia, and swelling of the legs. It also removes constipation.
How to do it:
- Stand straight on the mate, the feet should be 10 to 12 inches from one another.
- While doing Tadasana stretch both arms in front, the palms facing the ground.
- Now harden the body, inhale, and hold your breath.
- Then bend at the knees as is done while sitting on a chair.
- Now rise slowly and release breath.
- Later, when one has the practice of doing this pose on the feet, you should do it on the toes.
- In the beginning, this pose can be done for 15 seconds and later the duration may be increased up to three minutes.
Poses which are prohibited in Hernia Problem
Some poses are avoided in Hernia, they can worsen the situation. The poses are:
- Cobra Pose (Bhujangasana).
- Surya Namaskar.
- Seated Forward Bend (Pashchimottasana).
- Yoga Mudra.
Leave a Reply